Ligaments are strong, fibrous tissues that connect bones or cartilage at a joint. They provide stability to the joint and allow movement within a safe range. If we don’t stretch and move our ligaments they can become more rigid, causing the range of motion for that joint to decrease. For people who spend most of the day sitting the ligaments along the front of the spine will shorten while the ligaments along the back of the spine will lengthen. Without intervention, over time these imbalances tend to lead to injury. It’s possible to increase resiliency of ligaments and improve spinal mobility through slow, static stretches, held for a few deep breaths or even several minutes. These stretches are not intended to get your joints to activate (the ‘pop’ heard with some chiropractic adjustments). They are meant to gently and slowly stretch the ligaments in the spine to help your body to stay more balanced and mobile.
Much like the progression of the seasons in our life (childhood and stubbed toes, adolescence and broken hearts) maturing adults have a new set of challenges. But if you take heed, aging can be an excellent adventure.
Let’s talk about tissue in your body that doesn’t contract (unlike muscles) but, instead, holds things together—specifically, bones to bones. You can’t exercise to get them stronger; when they tear, the joints (bone to bone) are no longer held together. Any guesses? Ligaments. (Ligare comes from Greek, “to bind.”)
Why do I believe in stretching your ligaments?
These ligaments do creep, shorten, and get stiffer. But how does this affect you? Let’s assume “stretching” never made it to your top-10 list. Let’s also assume you’ve been in some traumatic event—car accident, hit by a snowboarder, suffered an unfortunate slip and fall, had a chair pulled out from under you, or got pushed down by the class bully—but you did not pursue any treatment of any type. (That includes stretching every day to keep your mobility up where you hurt.) Likely, you were hoping that time would heal your wounds. Let’s add one more likelihood—that you have a job that requires sitting at a desk or you spend a fair amount of time in front of the screen with your head poked forward.
Caring for your ligaments feels tremendous and takes minimal physical effort. For those who need to sweat or feel the pain to know that something is happening, gravity-assisted ligament stretching (GALS) may seem silly. But over time, you will see the proof that these new actions are working.
Two poses to help stretch your thoracic ligaments

For now, let’s assume you don’t have an accelerated kyphosis or lots of inflammation in your spine. The goal here is to lie down on the bolster so your butt is positioned on one end of the bolster and your head is resting on the other. If you can’t easily get up and down off the floor, this can get a little tricky. In the worst-case scenario, get onto your hands and knees and make sure you position the bolster in such a way that, if you were to drop your pelvis toward one end of the bolster, you would land on the end of the bolster. Once there, make sure you bend your knees and put your feet apart for stability. Your hands will be on the floor next to the bolster, and you can lower down onto your elbows as you find a way to place your spine on the bolster. If you have strong enough abdominal muscles, you can lower yourself slowly without making a jarring contact as you lower yourself down. Once there, congratulate yourself.
The next part is simple. Keeping your knees bent and feet shoulder-width apart, put your arms out to the side. Hang out and allow gravity to influence the ligaments in the front of your spine, ultimately reducing your kyphotic curve/hump. While many people will lie on the roller and go back and forth while moving their arms and shoulders around (and that’s OK), I would prefer you to hang out in this static pose for several minutes. Your goal here is not to stretch or massage muscles but to get those ligaments to open up.
One caveat—if your shoulders are stiff, you can place your arms down to the side of the bolster, palms facing the floor. If that is too much stress, cross them on your tummy. Over time, you can try to move them down and out, but honor where you find yourself. If your shoulders are movable, experiment with putting your shoulders over your head.
How long should you stay here? If you can comfortably stay for two to three minutes, do so. But if it becomes hard or icky, take it in one-minute increments, and slowly progress over the next several weeks. If you feel your neck needs support, place a small pillow under your neck. Over time, as your spine gets straighter, you can lose that pillow prop. With your arms out to the side (either palms up or palms down, depending on what feels good), while keeping your knees bent, you should feel stable and like you could even close your eyes for a little catnap, or meditation.
To get off the roller or bolster, it’s just as easy to fall off as it is to sit up. Falling is easy, as there’s not much distance to navigate, and I have never seen anyone get hurt. If popping up from the ground is not part of your regular gig, once you have rolled off the log, you can get onto your hands and knees and crawl to the nearest piece of furniture for an assist. Some people with happy knees and hips can sit back up from the roller, move forward into a squat, and then stand up. If your knees are artificial or you can’t easily bend your ankles or hips, the rolling off and crawling is the way to go. Who cares? Just do it.
For those advanced individuals who can get up and down off the floor quickly and want to get after that excess curve with a little more tenacity, here’s a great next step.
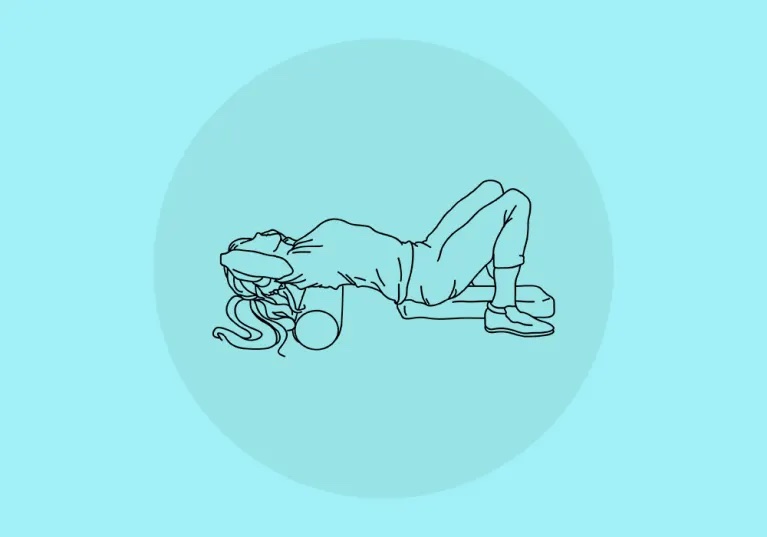
You will now be using the bolster horizontally to your body, as compared to how we just used it vertically. Put the bolster on the ground behind you while seated, position the bolster horizontal to your spine. Now lean back from your sitting posture on the floor; your mid back will contact the bolster trying to contact the apex part of your kyphotic curve. (Because the average person has his or her apex near the fourth thoracic, we’ve named this stretch the T4 stretch, but, in fact, your apex may be lower in the thoracic spine.)
As you lean back and feel the bolster on your mid back, you will do two things. No. 1, put your hands behind your head, making sure your head doesn’t extend too far back. No. 2, lift your pelvis a few inches upward, so your thighs are parallel to the ground. You will need to bring your feet directly under your knees to make this easier. To prevent your legs from getting tired, place the bolster under your pelvis so you can relax the pelvis and leg muscles. If your shoulders are stiff, keep your elbows pointed toward the ceiling and close together.
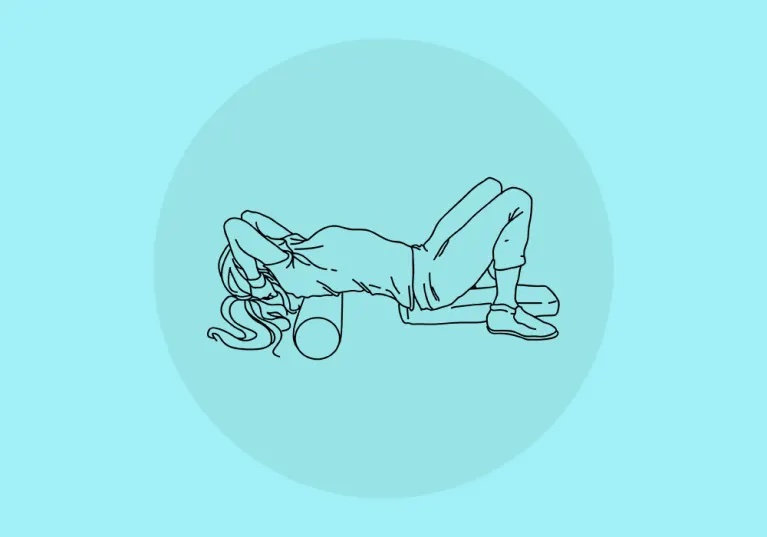
Position the roller so it is under the very apex of the hump or kyphosis. If you aren’t sure where that is, have a friend take a side-view shot and check it out yourself. Hang out here and breathe in and out.
Because you have to contract your butt muscles to keep the pelvis elevated (unless you are resting on the bolster) and use your hands to hold your big head up, this is not a position you want to hold for very long. If you have shoulder pain and can’t support your neck with your arms, then forget about it. You don’t have to be perfect at everything. (Go back and focus on the vertical roller exercise for your full spine.) If you can hold it for one or two minutes, while breathing in and out, you will start to make changes over time. Here is the best part. This is not a race or competition, and none of this should ever be uncomfortable. More is never better if it causes harm to you or anyone else.
How long should you do it? If you can comfortably stay for two to four minutes, do so. But if it becomes uncomfortable, take it in 30-second increments and slowly progress over the next several weeks.
For more information or to find out which stretches are safe for you, email us at info@evolvevancouver.ca to book an appointment with one of our chiropractors.